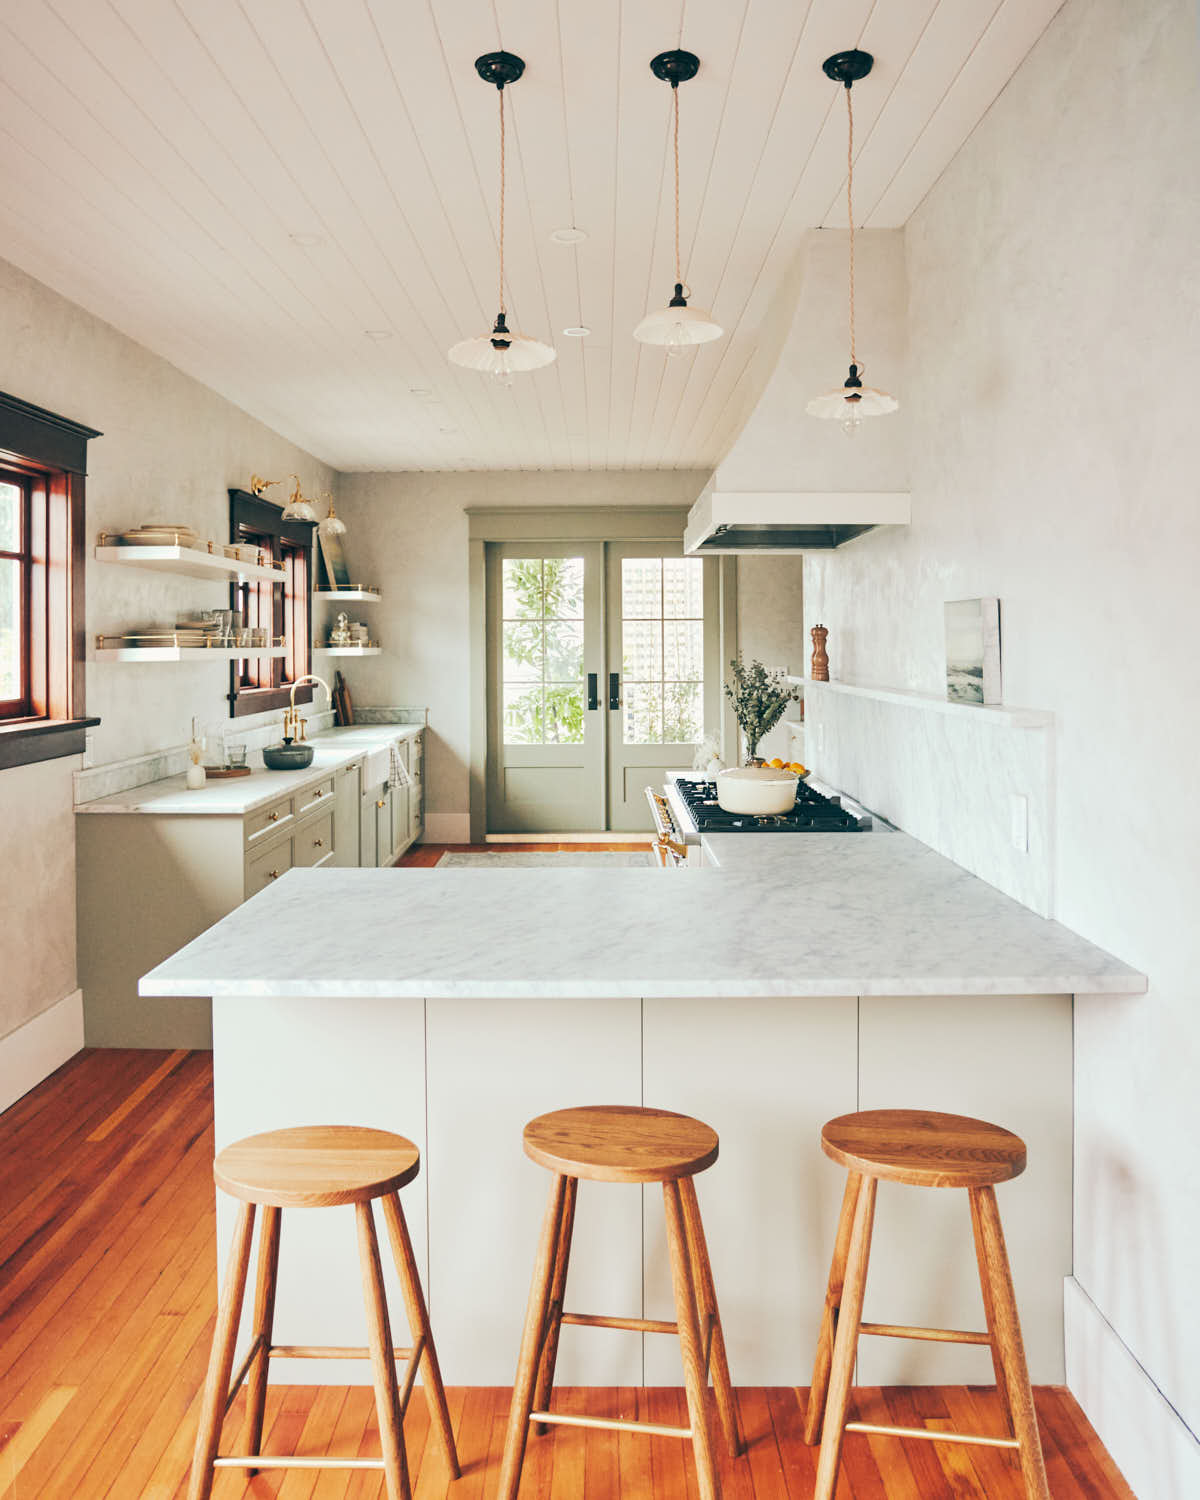
Take a peek at the Evergreen Kitchen headquarters (aka our family home). This is the kitchen where we cook, test, and photograph all the recipes you see on our blog and in our cookbook. But, it didn't always look like this! Keep reading to discover how we turned this space into a functional, beautiful kitchen for family life and work.
Our home renovation has been a work in progress for a few years now, with plenty of DIY projects along the way. But the kitchen renovation has us really excited!
Since our home kitchen doubles as our "office", we need something both functional and pretty. We use our kitchen daily for recipe testing, photography, and filming (even producing the whole Evergreen Kitchen cookbook here).
In this post, we’re sharing all the details of our kitchen renovation. We love our kitchen and hope you like it too!
Where it started
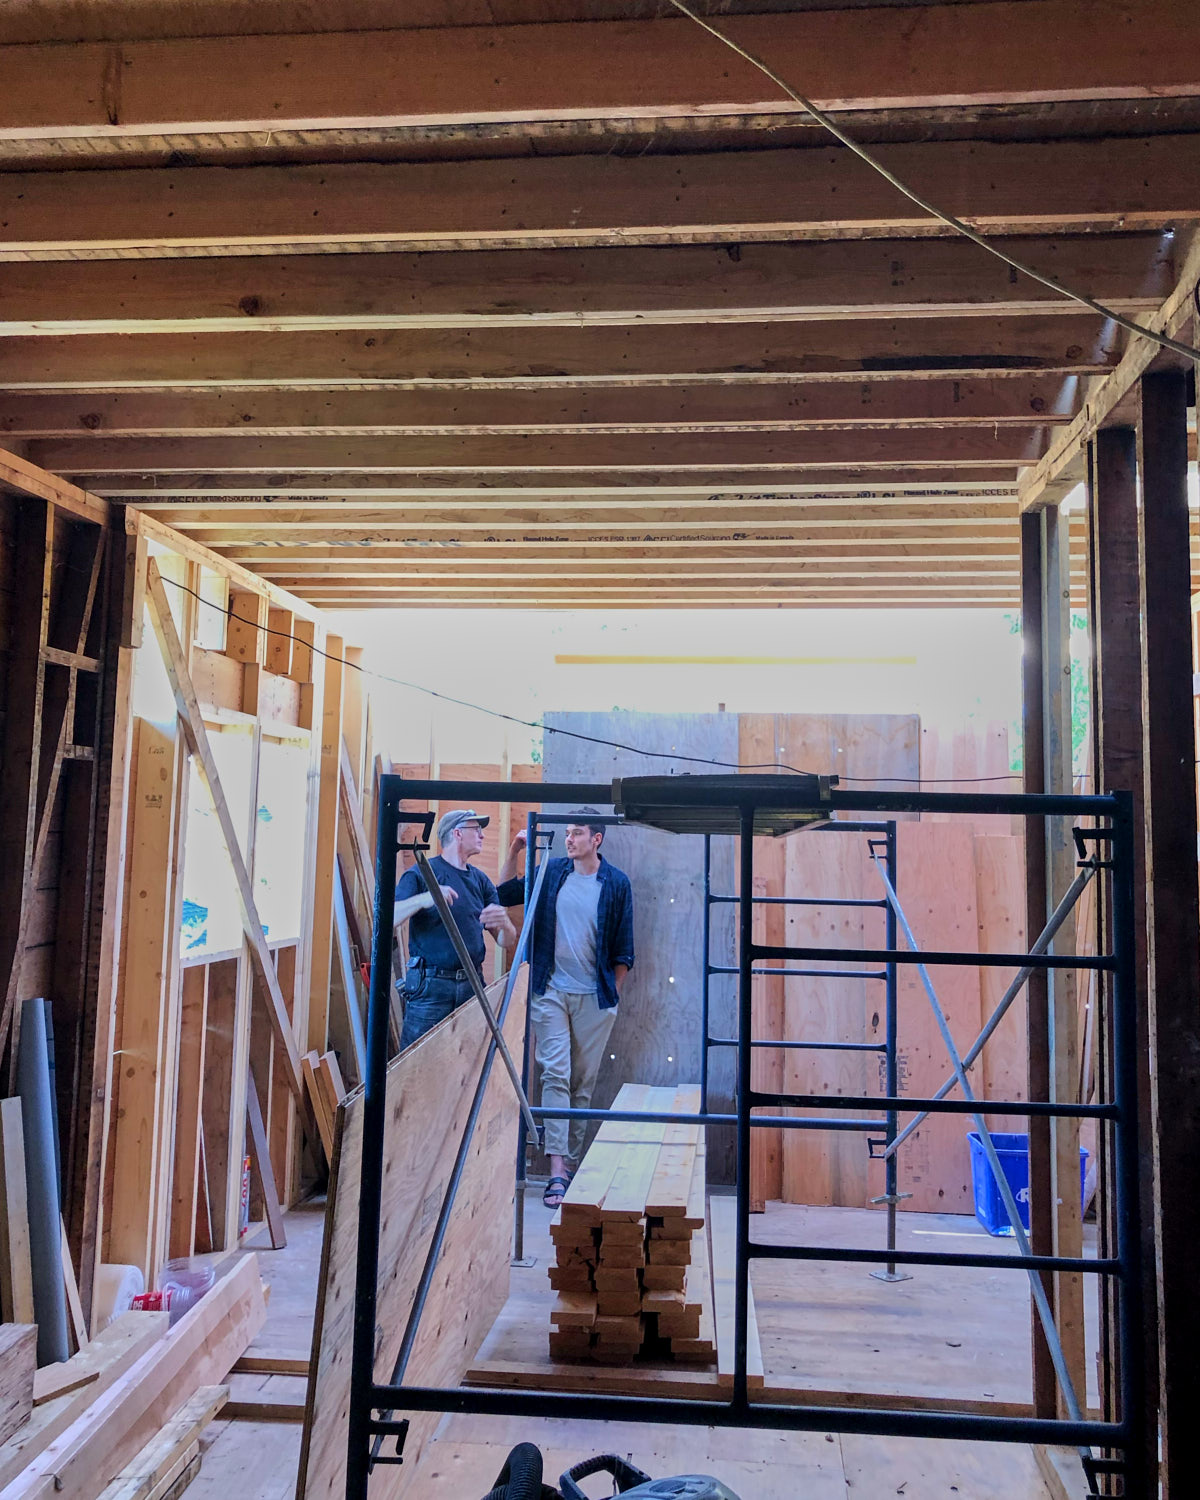
Our century-old home was listed “As Is Where Is”—aka, a total fixer-upper. Most expected it to be bulldozed, but we saw its potential and wanted to restore it.
First, we needed a functioning kitchen. The stove didn’t work, cabinet doors were missing, and the ceiling was falling apart. This is what the kitchen looked like:


The floor plan
Our top priority (besides working appliances!) was making the kitchen bigger. The house had a modest footprint—with no extra space to expand into—so we added an extension at the back. The width stayed the same, but the length almost doubled.
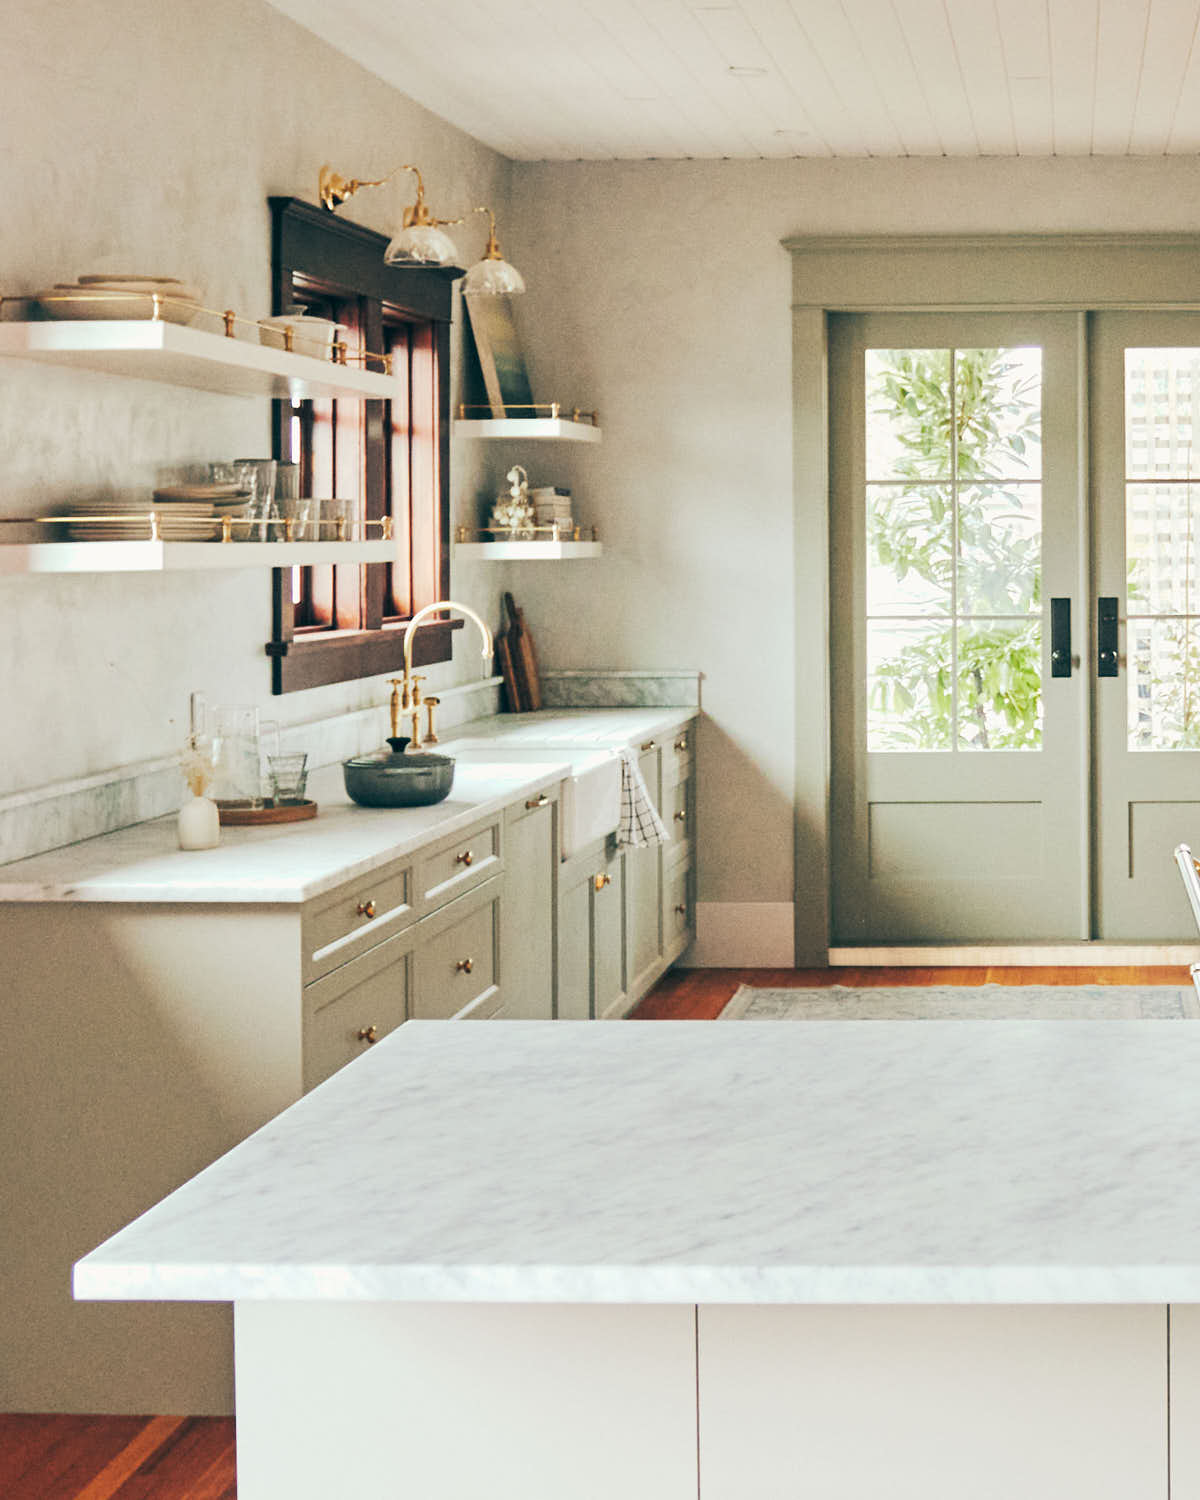
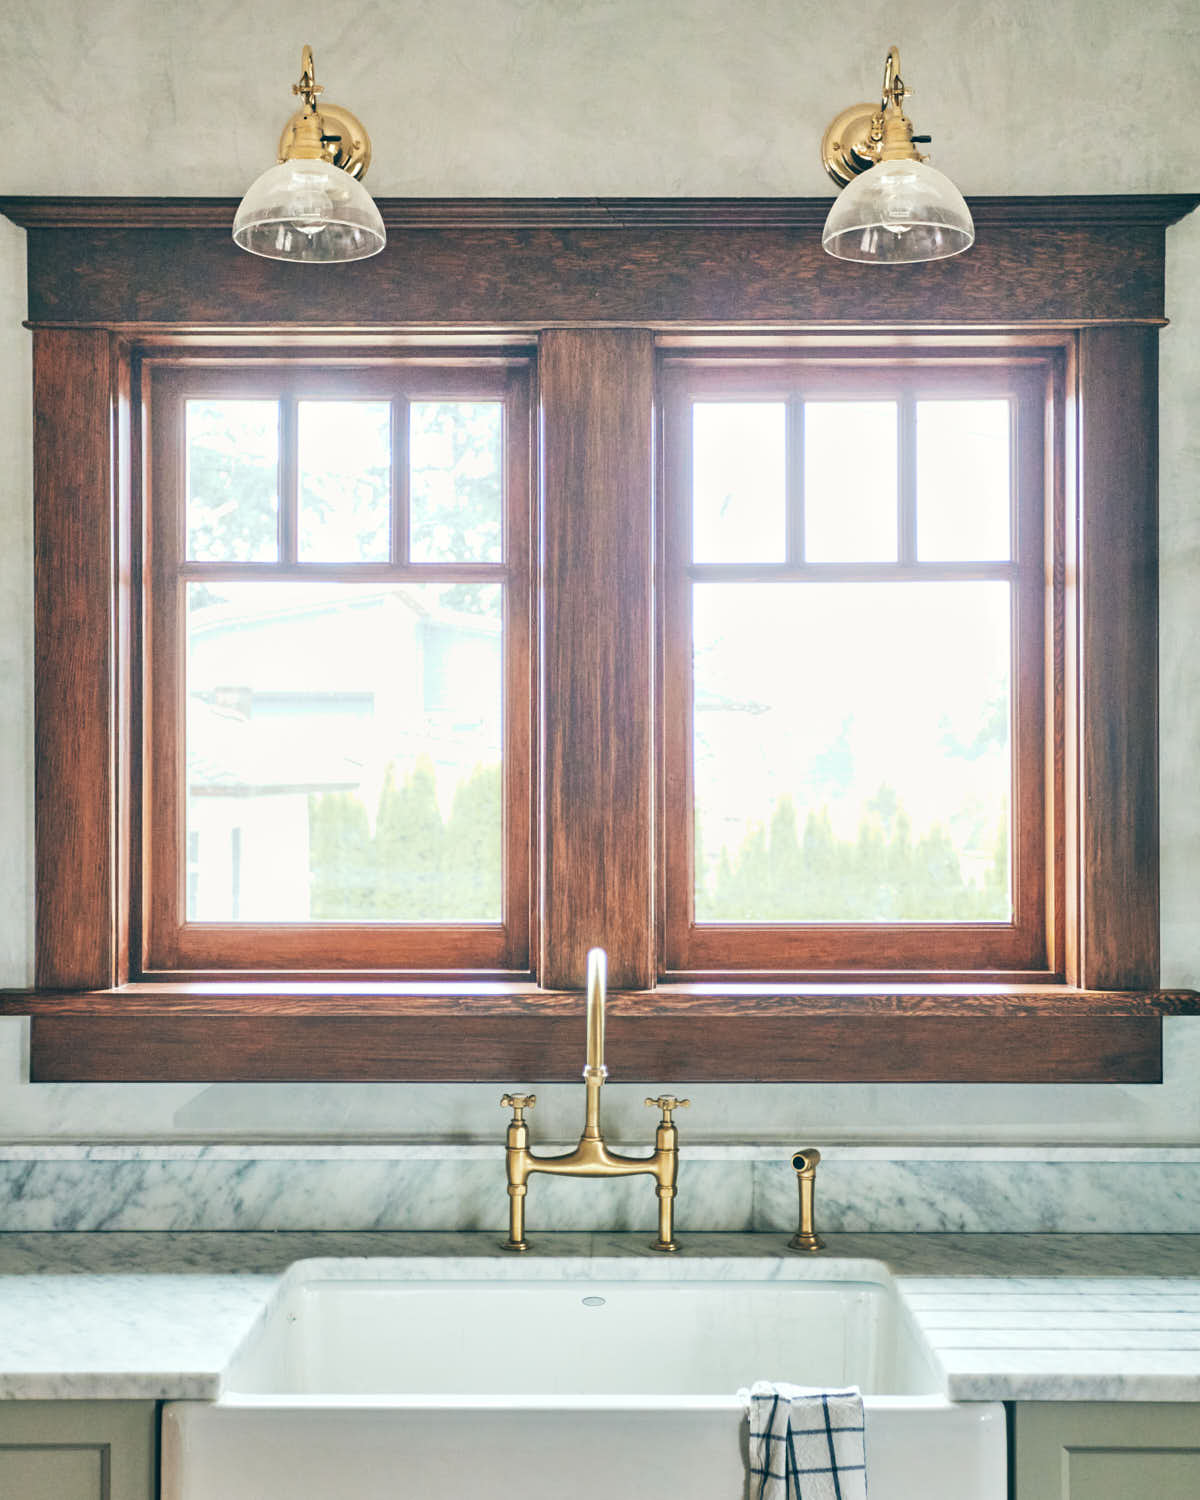
In the newly expanded kitchen, we gained wall space for double windows above the sink. We had the windows built to match the originals.
A set of double French doors lets a lot of natural light into the kitchen. To save money, we chose paint-grade doors and matched them to the cabinets for a cohesive look.
Cabinets and shelving
While there's nothing wrong with an all-white kitchen, it didn’t feel right for the age and character of our home. After many samples, we decided on a green-grey color for the cabinets. We’re really happy we went this route! It’s light enough to hide fingerprints but adds just the right contrast.
To keep the kitchen feeling open and bright, we chose floating shelves along the most visible wall in the kitchen. Then we maximized storage with floor-to-ceiling cabinets on the tucked-away pantry wall. It feels like the best of both worlds—airy, yet functional!
Stove
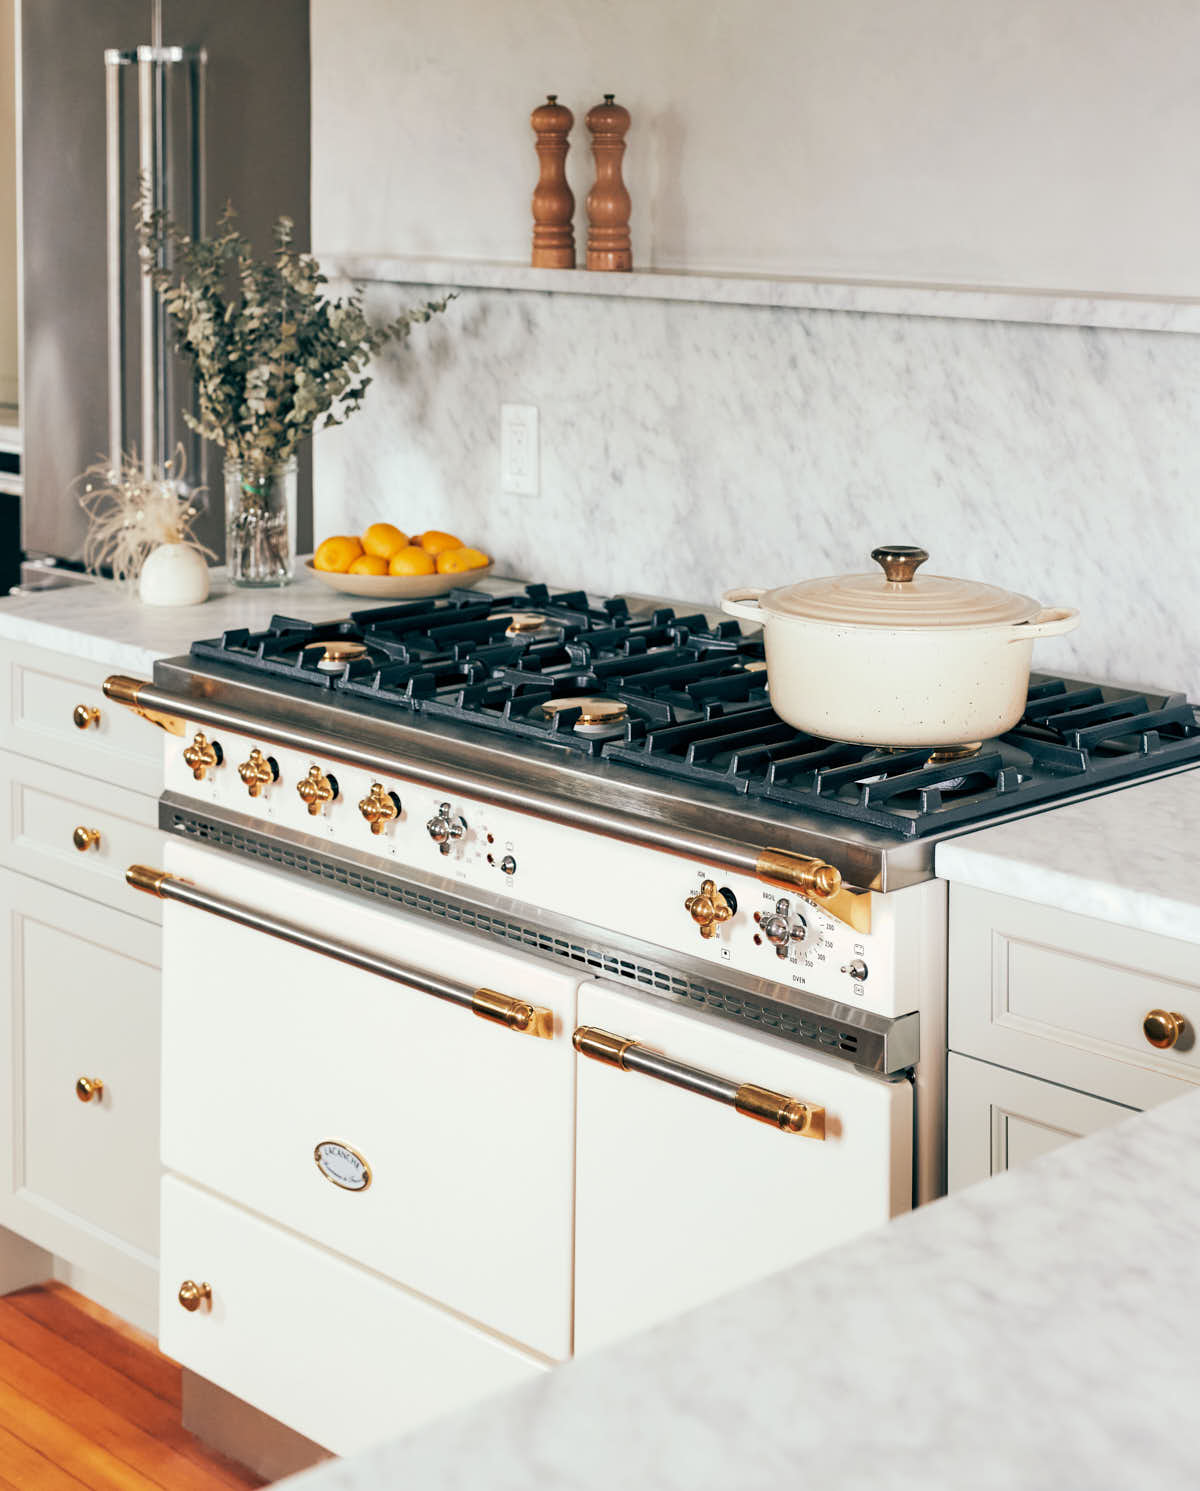
Of all the things we love in the kitchen, the Lacanche stove is the crown jewel! It stole my heart years ago and it was our big splurge of the renovation. We have the 44-inch Savigny model, in Ivory.
But it’s not just about looks—this stove is a workhorse. The cooktop and dual ovens get used for hours every day, whether I’m cooking for my family or for work. I’ve been seriously impressed with how well it performs.
When you order a Lacanche stove, you get to customize the burners, ovens, and accessories to fit your needs. Since there are so many choices, I really appreciated the how helpful the sales team was at the French Barn (Canada's Lacanche distributor). I ended up chosing two electric convection ovens, which I prefer for baking.
Lacanche Update
I've been using our Lacanche range for about 5 years now! We are still so happy with it. Here's some additional observations, now that we've had it for a while:
- Ovens: We love having two oven sizes! The smaller one heats up fast, so it’s perfect for quick weeknight meals. The larger oven fits regular sheet pans, making it ideal for baking cookies or big batches. Plus, being able to cook at two different temperatures is a game-changer for dinner parties and recipe testing.
- Longevity: This stove is built to last. It’s incredibly sturdy, and I love that it doesn’t rely on a bunch of modern electronics—fewer things to break! We’ve had a couple of minor tune-ups, but repairs were quick and easy. (The French Barn was amazing for connecting us with a service technician). Even the technician said Lacanche stoves are designed to be repaired, not replaced, which I love.
- Cleaning: It's surprisingly easy to clean. The grates lift off easily, making it simple to wipe underneath. We also love the enamel door fronts—way less fingerprint stress than stainless steel, especially with kids around. The brass finishes have developed a beautiful patina—which I love—but you can polish them if you prefer a shinier look.
Save this recipe!
Plaster hood fan
We installed a Vent-A-Hood fan, set inside a DIY range hood frame. My dad shaped the frame from scrap wood we had laying around the house. Then, I plastered the outside to match the walls in the kitchen. When we were looking for hood fans, we wanted one that wasn’t obnoxiously noisy and was also easy to clean. This one has delivered on both fronts.

Countertops and backsplash
It took us at least 6 months to pick out countertops. We went down the rabbit-hole comparing dozens of natural stone and quartz options.
We much prefer the look of natural stone, like marble. But, marble is sensitive to staining and etching. And, our kitchen gets heavily used since I’m a cookbook author and recipe developer. As much as I love patina, I was still worried about distracting food/drink stains (like from this Beet Pineapple Juice). So, the stain-resistant nature of quartz was definitely appealing.
Side note: Don’t confuse stain-resistant with stain-proof, because it’s not the same! I tested ketchup, mustard, turmeric, and other foods on different brands of quartz. They were definitely stain-resistant, but not necessarily stain-proof.
We searched everywhere for a quartz option that looked as stunning as real marble. But, we still couldn’t find one we loved. Sure, there are a handful that look “kind of” like marble. As in….if you squint your eyes and turn the lights down…they could look like marble-ish. But, no quartz ever “tricked us” into thinking it was the real deal.
The solution
It wasn’t until we discovered MORE Surface Care that we felt confident choosing real marble. Their product, MORE AntiEtch, is a crystal-clear coating protects marble from etching and staining for 10 years. It can be honed or polished to match your desired marble finish.
For us, this was the perfect solution. With MORE AntiEtch, we could go with the white Carrara marble countertops we dreamed of…without needing to worry about staining. A technician came to apply the finish right after our countertops were installed. We chose a honed finish because we prefer the matte/satin look. It took less than a day to apply, and the countertops could be used immediately after. A couple years in, our countertops remain stain-free. It was definitely the right decision for us!
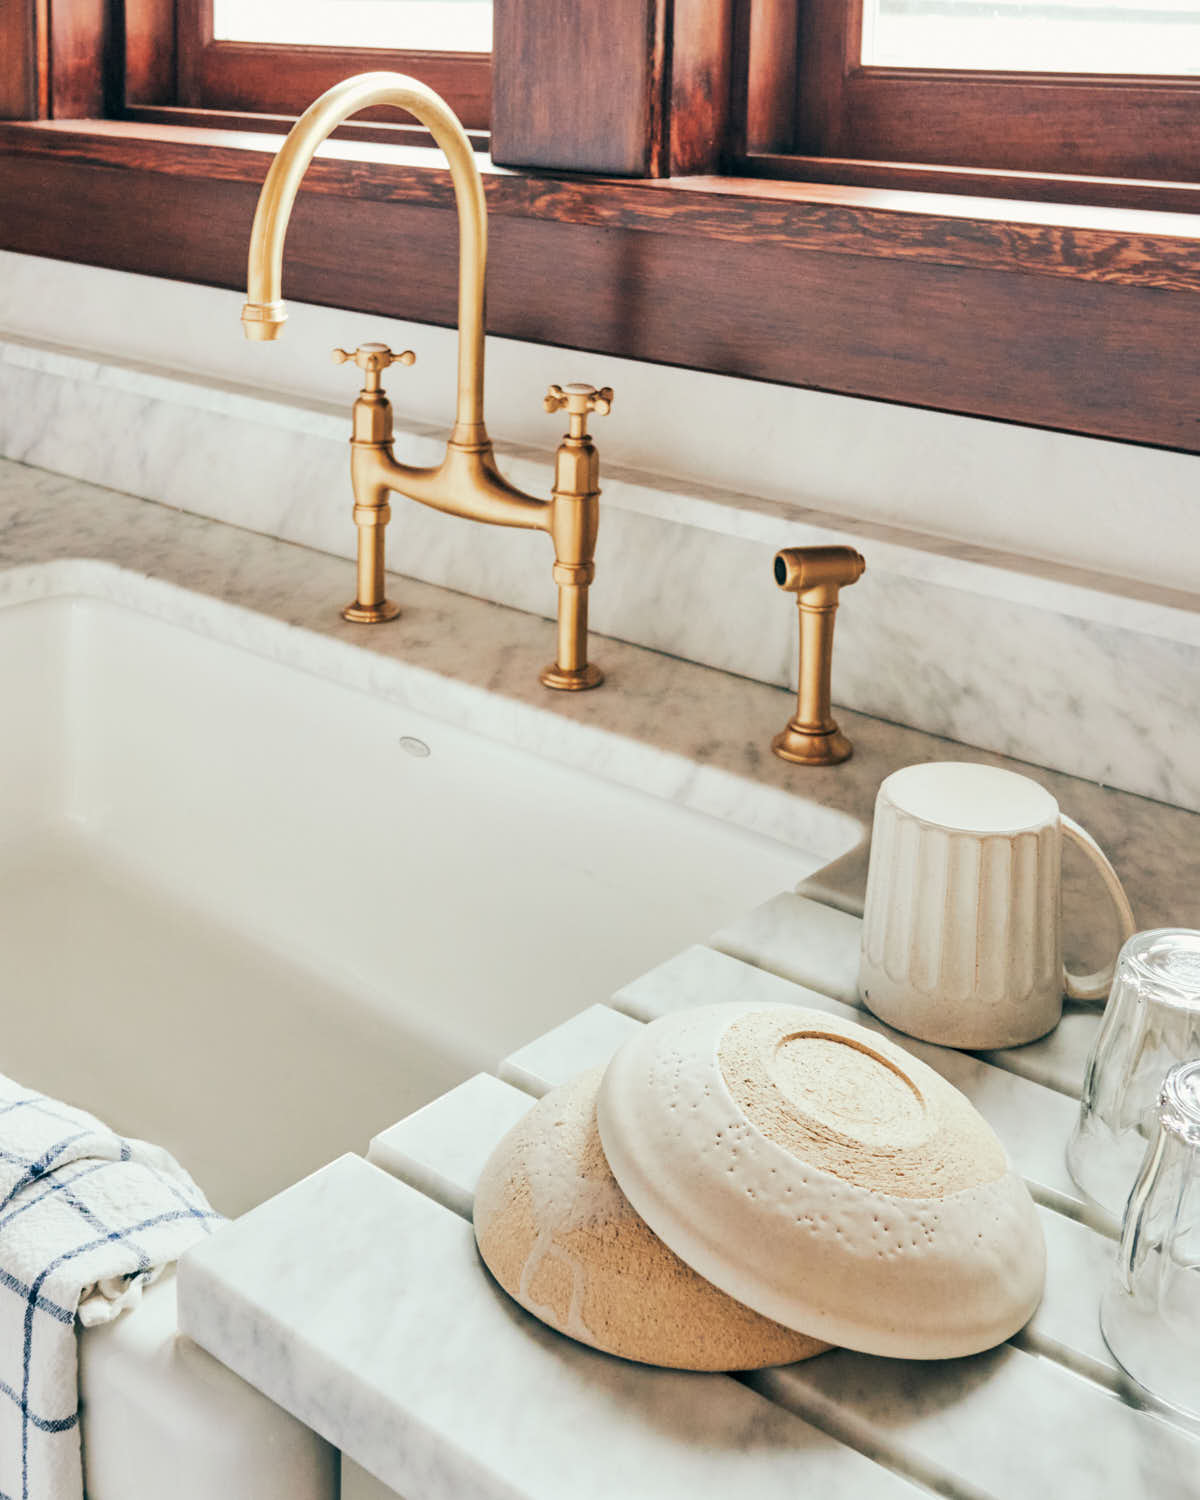

We had a drainboard fabricated directly into the marble counter next to the sink. This is a feature we absolutely love, because there’s no need to take out and put away an ugly dishrack! We also had the built-in drainboard treated with AntiEtch, so there’s no need to worry about staining here either.
Sink and faucet
We went with a 36-inch Kohler Cast Iron Apron Front Sink. We do a lot of dishes! And, we've been happy with its size and functionality. We prefer a single basin sink—rather than a divided one—because it makes it easier to fit large baking sheets and pots inside for scrubbing. But they sell a divided sink as well if you prefer. If you’re getting an apron front sink, you do need to be more careful about water drips down the front of the sink, which can get on the cabinets below. We wish we installed a drip edge. We will be adding one sometime soon!
For our faucet we went with an unlaquered brass finish, so that it would patina and look like it belongs in our old house. We love the look of it so much!
We feel so grateful to have this calming yet functional space to cook and create in every day. The kitchen is truly the heart of our home, and we still pinch ourselves that this is our “office”! If you have any questions about our kitchen, feel free to ask in the comments below!
LEAVE A COMMENT